Senin, 30 April 2012

Tutorial Menggunakan Pen Tool pada Photoshop

Menggunakan Pen Tool adalah kemampuan dasar yang harus dimiliki jika ingin menggambar dengan Photoshop. Karya seni seperti vexel membutuhkan teknik dasar Pen Tool untuk bisa membuatnya. Pen Tool juga bermanfaat ketika kita akan membuat karya yang membutuhkan garis-garis atau ketika ingin membuat seleksi. Disini akan saya berikan tutorial sederhana dalam menggunakan Pen Tool.
Tutorial menggunakan pen tool pada photoshop

Pengenalan Bagian-bagian Pen Tool

Sebelum memulai pilih Pen Tool yang terletak pada menu vertikal sebelah kiri jendela Photoshop dan perhatikan bagian-bagian Pen tool berikut. Setiap bagian yang perlu akan saya beri penjelasan mengenai fungsinya masing-masing.
Tutorial menggunakan pen tool pada photoshop

Opsi untuk Pen Tool

Tedapat tiga pilihan yang terdapat dalam kotak. Pilihan yang berfungsi ketika menggunakan Pen Tool hanyalah bagian pertama dan kedua saja, sedangkan bagian ketiga hanya berfungsi ketika menggunakan Rectangle Tool atau sejenisnya.
1. Shape Layers
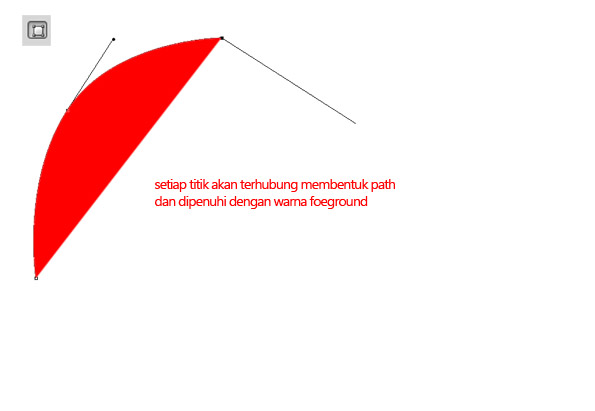
Dengan memilih Shape Layers maka setiap titik yang kita buat akan dihubungkan membentuk sebuah bidang (shape). Jika antara garis path dan garis yang menghubungkan titik pertama dan terakhir membentuk sebuah area, maka secara otomatis area tersebut akan terpenuhi dengan warna foreground.
Tutorial menggunakan pen tool pada photoshop
2. Paths
Pada opsi Paths setiap titik yang dihubungkan akan membentuk path dan tidak membentuk bidang secara langsung. Opsi inilah yang sering digunakan untuk membuat garis-garis vektor. Dalam tutorial ini opsi inilah yang paling banyak akan kita bahas.
Tutorial menggunakan pen tool pada photoshop

Rubber Band

Mengaktifkan Rubber Band akan sangat membantu karena akan menunjukkan bagaimana bentuk shape selanjutnya sebelum menambahkan Anchor Point.

Opsi Penggabungan Area Path

Disini terdapat empat bentuk penggabungan, masing-masing akan mebuat area yang berbeda jika dua atau lebih path area digabungkan. Untuk lebih jelasnya perhatikan gambar beikut.
Tutorial menggunakan pen tool pada photoshop

Cara Pertama Menggunakan Pen Tool

Ada dua cara untuk menggunakan Pen Tool. Cara pertama buat path baru dengan mengklik ujung kiri atas huruf U, tarik ke kanan dan klik lagi pada sudut lain yang ada di sebelah kanan titik yang pertama. Zoom in agar didapat hasil yang lebih akurat.
Tutorial menggunakan pen tool pada photoshop
Ulangi langkah ini untuk membuat path ke bawah sampai pada titik sebelum lengkungan. Untuk bagian lengkungan mulai dari titik terakhir, klik pada bagian tengah lengkungan, tahan klik dan tarik kursor ke kanan sampai path melengkung dengan rapi.
Tutorial menggunakan pen tool pada photoshop
lanjutkan dengan cara yang sama sampai titik yang terakhir berhimpitan dengantitik yang pertama.

Cara Kedua Menggunakan Pen Tool

Sebenarnya yang membedakan cara pertama dan kedua hanyalah pada bentuk melengkungnya, sedangkan untuk garis yang lurus sama saja dengan cara yang pertama. Jadi pertama buat path untuk garis lurusnya. Klik pada titik permulaan melengkung, lalu klik lagi pada bagian tengah lengkungan. Disini tidak perlu ditahan dan ditarik. Tekan Ctrl dan klik untuk menyudahi path.
Tutorial menggunakan pen tool pada photoshop
Tambahkan Anchor Point pada bagian tengah garis path di bagian lengkungan dengan klik kanan pada path dan pilih Add Anchor Point. Tekan Ctrl, klik Anchor Point yang baru dan tahan lalu geser ke sudut kiri bawah sampai posisinya sesuai lengkungan.
Tutorial menggunakan pen tool pada photoshop
dapat juga dilakukan dengan Add Anchor Point Tool.

Menggunakan Path yang Sudah Jadi

Dari langkah yang diatas kita selesaikan path tersebut sampai membentuk huruf U. Path yang sudah jadi dapat digunakan untuk membuat Vector Mask, mendefinisikan Custom Shape, membuat seleksi, memenuhinya dengan warna dan Stroke Path. Klik kanan pada path untuk memunculkan pilihannya.
Tutorial menggunakan pen tool pada photoshop

Create Vector Mask

Dengan path yang sudah jadi kita dapat mengkrop layer dengan Vector Mask layaknya seleksi untuk Layer Mask.
Tutorial menggunakan pen tool pada photoshop

Define Custom Shape

Kita bisa membuat shape sendiri dengan path yang sudah kita buat. Jadi selanjutnya jika ingin membuat path yang sama tinggal menggunakan shape tersebut. Caranya klik kanan pada path, pilih Define Custom Shape, beri nama shape baru ini, tekan OK.
Tutorial menggunakan pen tool pada photoshop

Make Selection

Klik kanan pada path lalu pilih Make Selection untuk mebuat seleksi yang bentuknya seperti path yang kita buat.
Tutorial menggunakan pen tool pada photoshop

Fill Path

Dari path kita juga bisa mengisi areanya dengan warna tetentu. Bisa dengan warna foreground, background, pattern atau warna lain yang bisa kita pilih sendiri. Kita juga bisa mengatur Blending Mode dan Opacitynya.
Tutorial menggunakan pen tool pada photoshop

Stroke Path

Stroke Path digunakan untuk membuat garis dengan bentuk sepeti path, bisa dengan Brush atau lainya.
Tutorial menggunakan pen tool pada photoshop
Demikian tutorial dasar menggunakan Pen Tool pada Photoshop, Sumber http://id.grafisia.com

Minggu, 29 April 2012

Membuat seleksi dengan channel dan layer mask


Pada tutorial kali ini kita akan belajar lagi tentang pembuatan seleksi pada Photoshop dengan mengggunakan layer mask. Seleksi dengan tehnik ini cocok digunakan untuk menyeleksi bagian yang sifatnya halus seperti ujung rambut ataupun bulu. Seleksi ini dibuat dengan membuat sebuah gambar hitam-putih yang digunakan sebagai dasar dari pembuatan seleksi-nya.

Cara membuat seleksi rambut pada Photoshop dengan detil

Bukalah gambar yang akan dibuat seleksi-nya dengan Adobe Photoshop. Pada contoh berikut ini saya menggunakan sebuah gambar foto yang diupload di Flickr oleh Asianleggy, yang sangat disayangkan sekarang sudah tidak aktif lagi di Flickr. Gambar di bawah ini sudah kupotong sebagian dengan Crop tool agar lebih memfokuskan pada bagian rambut yang akan diseleksi.
tutorial photoshop untuk membuat seleksi dengan channel dan layer mask, gambar 1
Aktifkan palet Channels (Window > Channels). Pada palet ini, pilihlah sebuah channel yang kamu anggap paling kontras. Kemudian duplikat-lah channel yang paling kontras tersebut (dengan menariknya ke icon new channel di sebelah bawah dari palet channel).
tutorial photoshop untuk membuat seleksi dengan channel dan layer mask, gambar 2
Buatlah agar gambar yang hitam putih pada foto yang sedang kita edit pake Photoshop ini menjadi semakin pekat dan nampak perbedaan antara bagian hitam dan putihnya.
Untuk membuatnya benar-benar hitam putih yang pekat, gunakanlah Burn tool, dan/atau Dodge tool pada tool box-nya Photoshop.
  1. Saat menggunakan Burn tool
    Pilihlah pada option bar, range = Shadow. Exposurenya jangan terlalu banyak, sekitar 10-20% aja. Gunakan tool ini untuk menghitamkan area gambar.
  2. Saat menggunakan Dodge tool
    Pilihlah pada option bar, range = Highlite. Exposurenya juga jangan terlalu banyak, sekitar 10-20% aja. Gunakan tool ini untuk memutihkan area gambar.
Kedua tool ini digunakan karena mengingat sulitnya mengisikan warna pada tempat yang sangat kecil atau sempit. Bagian ujung dari rambut sangatlah kecil, utamakan untuk menghitamkan bagian itu terlebih dulu. Berganti-gantilah antara kedua tool tersebut hingga didapat bagian tepi dari gambar tersebut berwarna hitam dan putih.
tutorial photoshop untuk membuat seleksi dengan channel dan layer mask, gambar 3
Untuk mempertahankan bagian rambut yang agak transparan, maka gunakan adalah Burn tool terlebih dulu. Tool ini kupakai untuk menghitamkan lebih dulu dengan tujuan agar bagian rambut yang agak transparan tidak keburu tertutup oleh Dodge tool.
Setelah bagian-bagian tepi dari gambar sudah nampak kontras dan berwarna hitam dan putih, sekarang buatlah seluruh bagian dalam dari gambar benar benar berwarna hitam dan putih seperti contoh gambar dibawah ini. Untuk mengisikan warnanya, gunakanlah Brush tool.
Saat menggunakan Brush tool, pastikan warna Foreground dan Background adalah hitam dan putih (ini bisa dilakukan dengan menekan tombol D pada keyboard. Jika perlu membalik warnanya, tekan huruf X di keyboard).
tutorial photoshop untuk membuat seleksi dengan channel dan layer mask, gambar 4
Langkah berikutnya, mengingat bahwa prinsip penggunaan mask adalah: Hitam berarti tidak menjadi seleksi, dan Putih menjadi seleksi. Maka gambar ini perlu kita balik warnanya. Lakukan ini dengan memilih menu Image > Adjustment > Invert. Hasilnya seperti gambar dibawah ini.
tutorial photoshop untuk membuat seleksi dengan channel dan layer mask, gambar 5
Setelah menjadi seperti gambar diatas, kliklah icon Load channel as selection, letaknya di bagian bawah kiri pada palet Channels. Kemudian aktifkan lagi channel RGB, dengan cara meng-klik channel RGB yang ada pada di urutan paling atas di palet channel.
tutorial photoshop untuk membuat seleksi dengan channel dan layer mask, gambar 6
Sekarang pindahlah ke palet Layer. Jika gambar ini merupakan layer background, maka klik dua kali pada nama layer-nya kemudian klik OK. Setelah ini, klik icon Add layer mask, letaknya di bagian bawah dari palet layer.
Untuk melihat hasilnya akurat atau tidak, buatlah sebuah layer baru yang diisi dengan warna abu-abu, layer ini kemudian diletakkan urutannya di bawah layer yang sudah kita kerjakan tadi.
Hii..ternyata ada bagian dari rambut yang nampak putih tepinya. Ini karena pada bagian tersebut gambar rambut sudah bercampur dengan background yang warnanya agak putih juga. Untuk menghilangkan warna putih ini, pilihlah warna yang mirip dengan warna rambut model ini (gunakan saja Eyedropper tool), kemudian sapukan warna ini dengan Brush tool. Pada saat menyapukan warna ini, mode blending sapuan brush kuganti dengan Darken (pengaturan ini ada pada option bar).
tutorial photoshop untuk membuat seleksi dengan channel dan layer mask, gambar 7
Berikut ini adalah hasilnya yang sudah terpotong dengan seleksi dan kuhilangkan warna putih di tepi rambutnya tadi.
tutorial photoshop untuk membuat seleksi dengan channel dan layer mask, gambar 8
Mudah kan caranya, walaupun memang agak njlimet dan perlu ketelitian.

Tutorial Photoshop Seleksi Menghaluskan Tepian

Seleksi Menghaluskan Tepian dipakai ketika membuat seleksi seperti dengan magic wand atau tool seleksi photoshop lainnya. Jika anda pernah menggunakan magic wand, lasso, ataupun selections tools lainnya untuk membuat seleksi pada foto dengan Photoshop, tentu akan mendapatkan sebuah tepian seleksi yang bergerigi.
Maksud dari memperhalus tepian seleksi adalah agar saat menggabung dua gambar yang saling menindih tidak kelihatan berasal dari dua gambar. Hasil gambar yang saling bertindihan tersebut akan menyatu ( blend ) secara objek pixel. Nah selain cara tersebut, saat menggabung dua gambar atau lebih menjadi satu gambar dengan hasil yang optimal kita harus menyamakan :
  1. kontras cahaya dan kecerahan ( brightness contrast )
  2. jumlah titik hitam ( exposure )
  3. kesamaan banyaknya warna pembentuk ( color balance )
  4. tingkat terang dan ketajaman gambar ( level )
  5. hue saturation
  6. pengaturan warna netral ( vibrance)
  7. arah pencahayaan yang niasanya hasil lebih baik jika gambar sudah sama arah cahayanya ( shadow and highlight )
Tapi kita tidak perlu khawatir mengenai persoalan menggabung dua gambar menjadi satu. Kita akan membahas bagaimana tepian seleksi photoshop ini bisa diperhalus dengan live view ( langsung terlihat perbedaan sebelum dan sesudah, terutama pada photoshop CS3 ke bawah yang belum ada fungsi refine edge ). Pada Photoshop, ini dapat diminimalir dengan memberikan Feather pada seleksi. Namun pada Photoshop untuk memberikan Feather tidak langsung mendapatkan previewnya ( gambaran setelah di feather, live view ), sehingga relatif lebih sulit dilakukan.
Tutorial Photoshop Menghaluskan Tepian Seleksi
Gambar di atas menunjukkan bahwa gambar hasil seleksi yang tidak dihaluskan tepiannya.

Menggunakan Feather pada Photoshop

Feather bisa dibuat sebelum atau sesudah seleksi dibuat. Jadi perlu ditekankan bahwa ada dua buah membuat feather pada seleksi photoshop.

Sebelum seleksi dibuat

Langkah 1
Buka gambar foto ke dalam jendela kerja photoshop menggunakan menu File > Open.
Langkah 2
Selanjutnya kita akan membuat seleksi dengan polygonal lasso tool. Klik polygonal lasso tool pada tool box kemudian atur feather pada Tool Option Bar (biasa juga disebut property bar karena menyediakan opsi-opsi tertentu yang tersedia pada saat kita melakukan sesuatu pada photoshop).
Anda sudah siap membuat seleksi dengan feather yang sudah diatur.
Tutorial Photoshop Menghaluskan Tepian SeleksiNotes :
Penggunaan feather disesuaikan dengan ukuran gambar ( size ) dan resolusi gambar ( sebenarnya kualitas gambar seperti tingkat detail juga penting namun tidak dibahas pada artikel ini). Besarnya feather berbanding lurus dengan dua hal tersebut. Jika resolusi besar atau size besar maka feather juga besar dan sebaliknya. Pelajari besarnya ini dengan coba-coba untuk memahami apa yang saya maksud.

Setelah seleksi dibuat

Langkah 1
Buka gambar foto ke dalam jendela kerja photoshop menggunakan menu File > Open.
Langkah 2
Selanjutnya kita akan membuat seleksi dengan polygonal lasso tool. Buat seleksi pada gambar dengan cara klik drag seperti biasa.
Tutorial Photoshop Menghaluskan Tepian SeleksiLangkah 3
Jika seleksi sudah jadi kita selanjutnya akan membuat feather / menghaluskan tepian seleksi. Caranya klik menu Select > Modify > Feather [ CTRL+SHIFT+F6 ]. Atur besarnya feather seleksi sesuai yang diinginkan.
Tutorial Photoshop Menghaluskan Tepian Seleksi

Cara Memperhalus Tepian Seleksi pada Photoshop

Setelah Anda selesai membuat seleksi, pastikan layer yang Anda seleksi dalam keadaan aktif. Dan pastikan bahwa layer ini bukan merupakan layer background yang ada ikon kunci gembok. Jika layer yang Anda seleksi adalah layer background, maka klik dua kali pada nama layer background ( akan keluar dialog box new layer ), kemudian klik OK.
Tutorial Photoshop Menghaluskan Tepian Seleksi
Setelah gambar diseleksi entah menggunakan lasso tool, color range, atau Quick Selection Tool dll, kemudian klik icon Add Layer Mask pada palet layer.
Tutorial Photoshop Menghaluskan Tepian SeleksiDan pastikan Anda selalu aktif di layer mask, bukan pada gambar aslinya. Layer mask itu adalah gambar thumbnail hitam putih di Palet layer, letaknya tepat disamping thumbnail layernya.
Pilihlah menu Filter > Blur > Gaussian Blur. Tentukan seberapa banyak tingkat kehalusan gambar yang Anda inginkan.
Tutorial Photoshop Menghaluskan Tepian Seleksi
Jika tepian halus yang Anda inginkan hanya pada perbagian dari gambar, maka gunakanlah Blur Tool yang ada pada Tool Box.
Catatan :
Jika Anda menyeleksi pada ujung workspace / lembar kerja / kertas digital, maka Anda wajib untuk menutupnya menggunakan brush warna hitam pada mask setelah proses blur. Karena gambar pada ujung lembar kerja tidak seharusnya diperhalus.
sumber:  http://www.ahlidesain.com

bermacam layout koran

Simetris

Asimetris

Brace

Horizontal

Circus


Jika ditanya model layout mana yang populer, tentu saja jawabnya adalah asimetris, karena lebih dinamis dan paling fleksibel.

*
Surianto Rustam, Layout Dasar & Penerapannya

Kamis, 19 April 2012

Really Cool Digital Make up in Photoshop in 10 min

Why use real make up if you can do a digital make up and make the skin look pretty and smooth. It's simple, fast and very effective.

Well, on this tutorial you will learn step by step the basics of digital make up on a persons body.
First you have to get the photo you want to apply the digital make up, I choose a photo from the stock gallery of Samantha Draven.
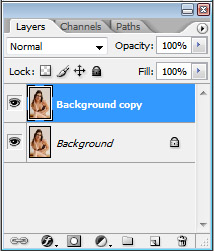
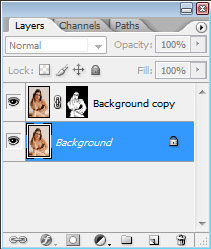
After you open the photo you want to use, duplicate the layer.
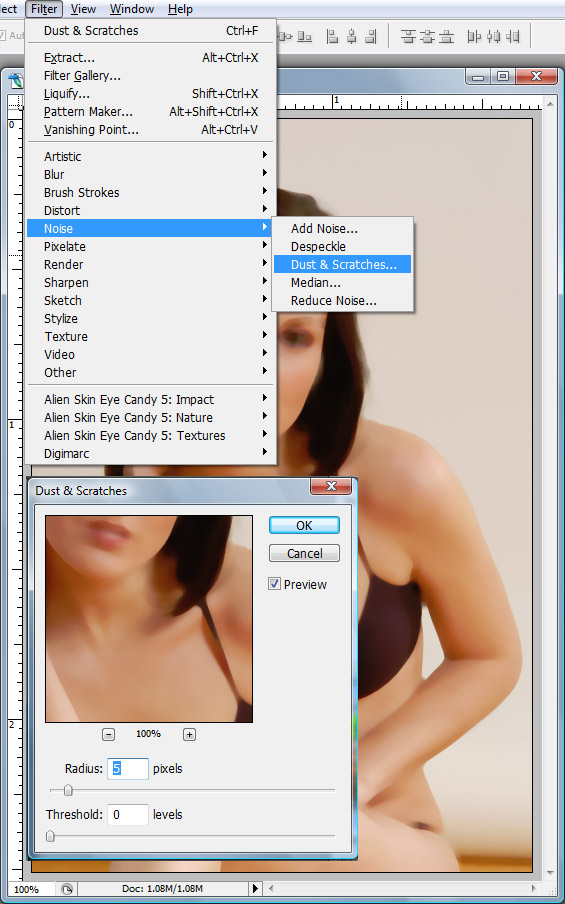
And apply Filter > Noise > Dust & Scratches ( Radius: 5 pixels and Thereshold 0 levels ).
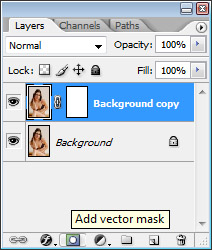
Now add a mask to your layer.
On the layer mask you just created, select a good size brush select the color black and paint the background and the hair, leaving only the skin area white as you see here:
( This way only the skin will have the Dust & Scratches effect we applied earlier)
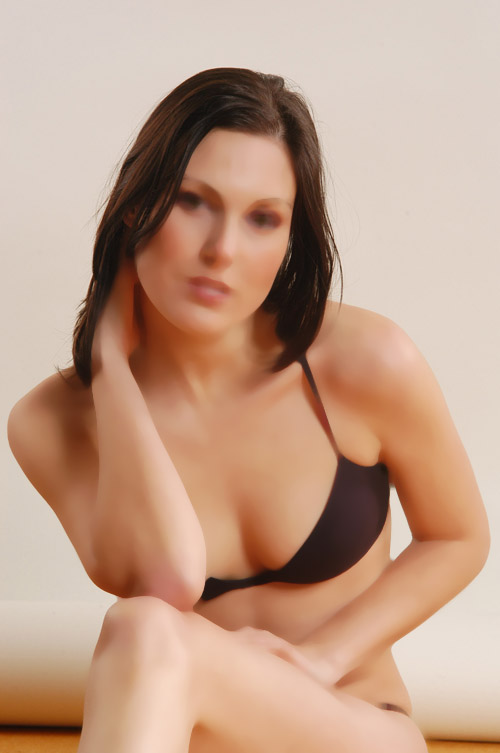
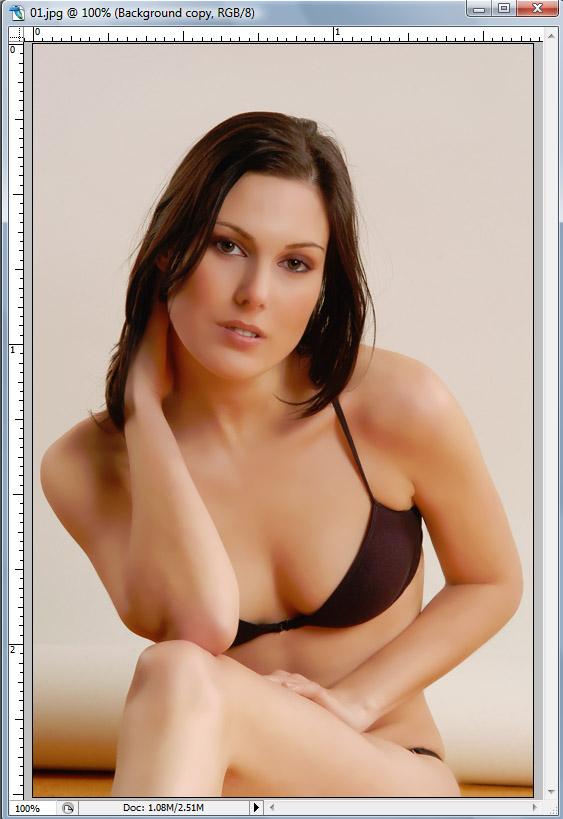
And the photo will look like this:
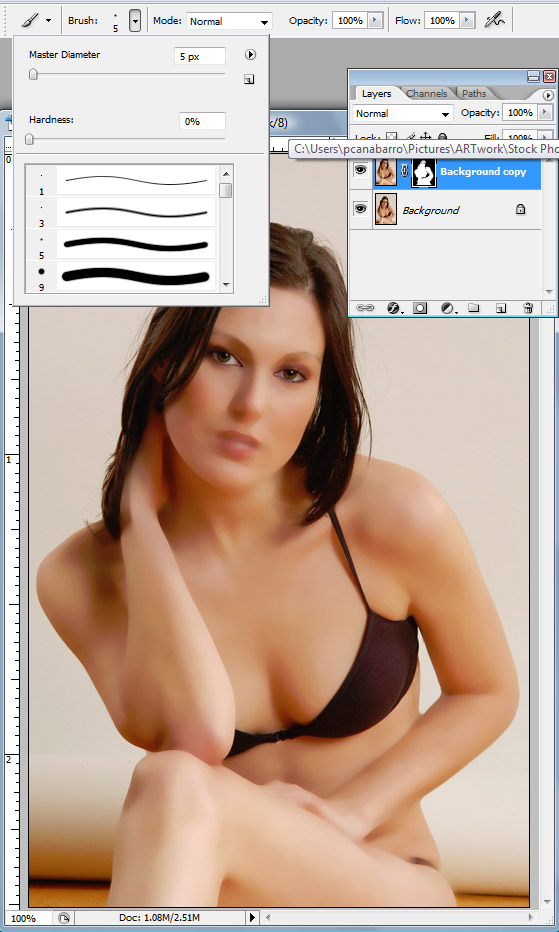
Now with a smaller brush keep painting with the color black, but now only the eyes and the bikini so they will also have the original look as you see here:
After you do that, change the Opacity of your brush to 25%
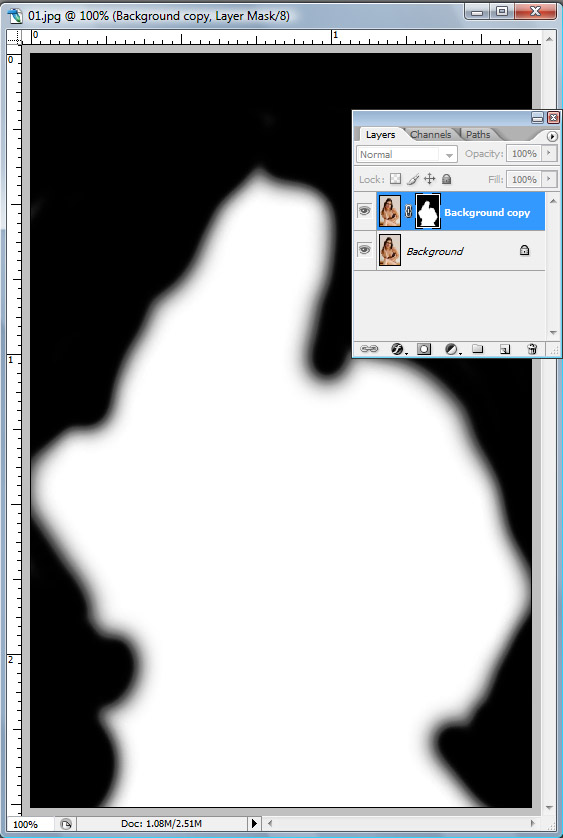
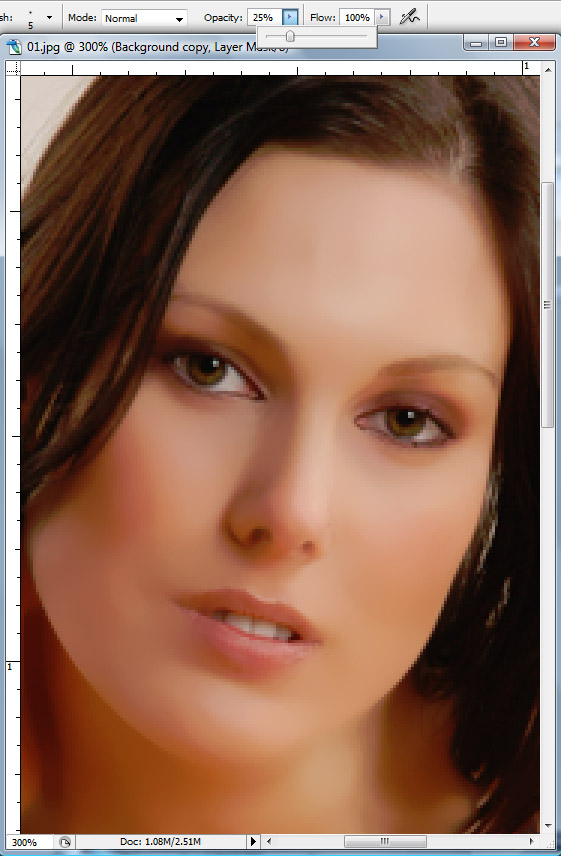
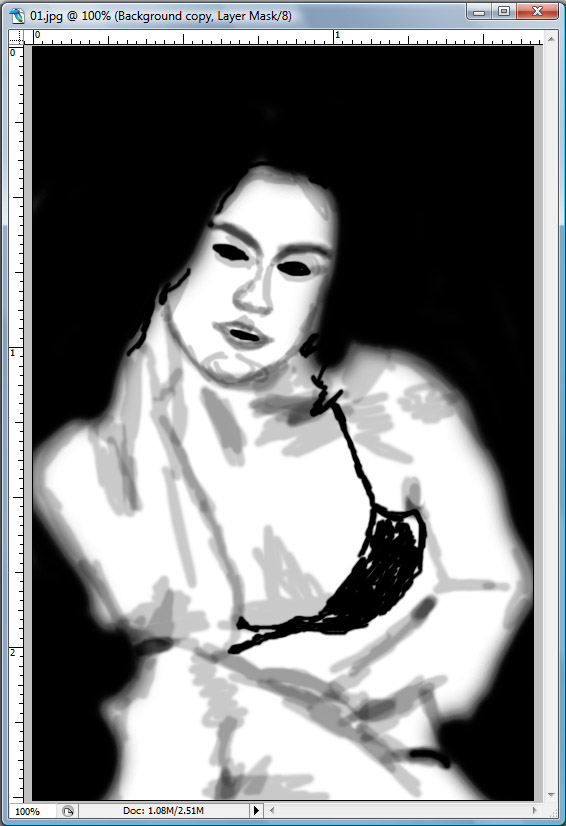
Now paint all the curves on her skin little by little on her face and body, go over the nose, mouth, chin, and most curves of her face and body just so her real face appearance will start to show again but with the clean skin, this is how your mask layer should look when you done:
And this is how the photo should look:
Now go back to the background layer
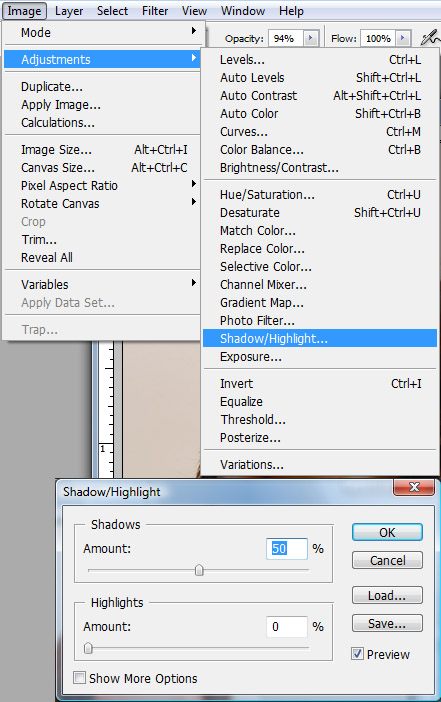
And apply Image > Adjustments > Shadow/Highlight ( The amount of Shadows is 50% and Highlights 0 ) so we can give more light to her hair.
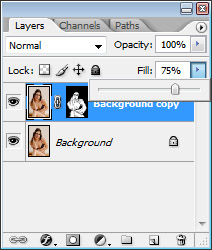
Go back to the Background Copy layer and change the Fill to 75% so her skin can look more realistic.
Here is the final result:

Click on the Image to compare the final result with the original.
This is the basic of creating a digital make up and from here we can work on the color of her skin adjust the background and add more touches to it. I will try to continue the tutorial as a series to a even better and more advanced result.
I hope everybody liked it and if you did show some love and leave a comment, if you didn't let me know and leave a comment too, I spent some time doing this,so spend a minute leaving your thoughts lol. Thank you very much!
sumber : http://abduzeedo.com

Tutorial : How to get perfect skin!

Well, at least in your photographs. :D
Do you have a near-perfect portrait of yourself, that is embellished by a pimple? Don’t you just hate when that happens? In this tutorial, I will show you how to get rid of all the unflattering marks on your face using Adobe Photoshop mostly by just using two tools. Yes, just two! You will be surprised at how easy it is to do it! So, let’s get started.
Step 1:
I’ll be using this photograph below as an example. You, you can dig up a photograph of yourself to try. Come on now, don’t be shy. Bring the photograph in to Photoshop, preferably using the biggest resolution version of that photograph that you have.
How to get perfect skin!
At this point, I would colour-correct the photograph first before continuing with the editing. Not sure how to? Feel free to read my tutorial on how to colour-correct your photos first. Don’t worry, we’ll wait. :D
Step 2:
Here’s the magic tool that you’ve been waiting for : Healing Brush Tool.

How to get perfect skin!
I’ve heard of designers and photo editors who have never even heard of this amazing tool, and I hope to help put that to an end with this tutorial (and after that, take over the world!). Using this tool is pretty simple, but first let’s set the correct options.
How to get perfect skin!
  1. Once you’ve clicked on the Healing Brush Tool icon, you will be presented with a toolbar of options. Click on the arrow button beside the Brush option.
  2. Set the diameter of the brush (ie. the brush size) to something small, depending on your image resolution. A good way to base this size upon is to see the diameter of the most visible blemish in your picture. Set the diameter to something slightly bigger than that. (But this really depends on the photograph and if there are a mess of blemishes together.)
    For this example, I’ve used 19 pixels as the brush size, but I change this brush size dynamically while using the tool on different parts of the face. Experiment! See what works for you.
  3. Now set the brush hardness to about 15%. This will give the brush a feathered edge, which will help blend the blemishes with the rest of the skin.
  4. You can ignore the rest of the options for this tutorial.
Step 3:
A tool can do wonders, but you have to properly use it to get great results. Here’s how you properly use the Healing Brush.
  1. Zoom in to your picture. I zoom in and zoom out often to see the overall progress. Remember the proverbial “You can’t see the whole forest if you just look at one tree”? It’s the same concept here, only more literal. Heh. Once you’re zoomed in (200% is usually enough, but again it depends on the resolution of the image you’re working with), press Alt (Option for Mac users) and left-click on a part of the face near to the blemish with nice skin. What this does, is to provide a source for Photoshop to correct the blemish you use the Healing Brush Tool on.
    How to get perfect skin!
  2. Alright, the trick is to just use the brush once on the blemish. Single clicking works better than holding the left-click and swiping across the blemish. So, do this : Alt + left-click on a nice part of the skin around the blemish, and then single left-click on the blemish. Repeat on other blemishes. Remember, do not swipe the brush around while left-clicking! The results will rarely turn out good. Single left-clicking for each blemish will give you the best results. :)
    How to get perfect skin!
  3. Now continue doing that for all the visible blemishes, keeping in mind to keep zooming out to see the overall progress. Also, remember to change your brush size as you see fit. Don’t use a huge brush on a small pimple, although sometimes using a smaller brush on a huge blemish works quite well too. If at some points, the Healing Brush Tool gives you a totally messed up result (like for example, a solid colour appears that’s not the colour you sampled or what your target is), undo and try again. If it still gives you the wrong result, ignore that for now. We’ll get to that in the next step.
Quick tip:
With the Healing Brush Tool in use (or any other brushes, really), you can use the ] button to increase the brush size and [ button to decrease it.
Step 4:
How to get perfect skin!
Here’s how the guy’s looking once I’m done. Looking quite good, no? This is just with using the Healing Brush Tool. If you click to enlarge the image, you might notice some parts are still not acceptable. Or maybe you might not notice, but I’m a borderline perfectionist. :P
You might also notice that if you use the Healing Brush Tool, and you want to clean up something that’s in a part of the photo that’s of high contrast, the tool might not work properly. Like for instance, a pimple that’s above the guy’s left eyebrow (that is, from our view, the right eyebrow). If you try to heal that using a 19 pixel brush, it will not turn out correctly. You could use a small brush, but we’ll use something else.
Remember, I mentioned two tools? The second one is the Clone Stamp Tool. It’s right below the Healing Brush Tool in the toolbar. The way to use this tool is exactly the same as using the Healing Brush tool. I’m going to use this tool to clean up the image a bit more.
How to get perfect skin!
Step 5: So here’s an example of what I used the Clone Stamp Tool for.
How to get perfect skin!
Then I noticed a bit more stuff I didn’t see previously. A bit more Healing and Cloning later, and here’s the end product…
How to get perfect skin!
Honestly, as I’ve mentioned somewhere else before, the trick is to know when to stop. You can continue if you like, but I am happy with the end product here.
But. Just for fun, I’m going to teach you another step I use.
Step 6:
Use any selection tool you’re comfortable with. Me, I enjoy playing around with the Magic Wand Tool once in a while. Set the options to the settings in the image below.
How to get perfect skin!
Click on the Magic Wand Tool and click on any part of the guy’s (or in your case, your own) face. Press Shift and click again until you get most of the face selected.
The Tolerance setting can be higher if you like. Setting it higher tells the Magic Wand Tool to select more of the pixels that looks like the ones you’ve chosen.
The purpose of this is not to get an exact selection. Just to get a somewhat of a face-mask-like selection of the face. Try not to get the hair, eyebrows, eyes, lips and nostrils selected. Don’t worry if you select lesser than the whole face ’cause it’s not necessary to get everything, but do not select the background or the shirt. If you do get some in, using the Magic Wand tool, press Alt instead of Shift to do some deselecting. Or use the history list (or Control Z) to undo.
Okay, next.
Step 7:
  1. Right-click and choose Layer via Copy. This will create a new layer with just the selected skin.
  2. Right-click that layer and choose Duplicate Layer…. You can ignore the options that follows and just click the OK button. That will create an exact copy of the layer you just created.
  3. Click on the 1st layer “eye” icon to hide the layer for a bit. We will use this later.
    How to get perfect skin!
  4. Click on Filter > Blur > Gaussian Blur. Depending on your picture resolution, experiment the Radius amount to one that will give your layer a nice, relatively flat, but slightly gradiented, consistent colour. For this image, I use 8.5 pixels for the Radius amount. It’s okay if your Radius amount is drastically different than mine. Previously, I’ve set it to about 30+ pixels for a 6 MP photograph. Once you’re happy with the blur, click the OK button. Try to aim for something like this:
    How to get perfect skin!
  5. Now, press the Control button and click on the layer you hid just now. It will grab the selection of the layer and that’s all you need. Now click on the Add Layer Mask button. If you had tried my cloning tutorial, you might remember where that is? If you don’t recall, here it is:
    How to get perfect skin!
Step 8:
Alright, this might seem weird, but we’re going to add some noise to the layer we have just blurred. This is to allow the blurred layer to blend better with the original image later on.
  1. Click on Filter > Noise > Add Noise…
  2. Under Distribution, check Uniform (as opposed to Gaussian, which in my opinion gives too strong of a noise distribution) and check Monochromatic, and set the Amount according to your original image noise level.
    The image I’m using is quite noisy, and a bit of experimenting shows that 1.5% noise gives a similar noise look to the original image, so that’s what I’m sticking with. Feel free to adjust the amount as you see fit. Skipping this entire Step 8 is okay too, if your original photograph is not visibly noisy.
  3. Click the OK button and let’s continue.
Step 10:
Now, click on the Brush tool, and choose a nice feathered brush size. This brush size will, again, depend on the image you have chosen. For the image I’m working with, I find that a size 27 feathered brush works quite well. Once again, feel free to use different sized brushes while you’re working; you don’t have to just stick to one size.
How to get perfect skin!
Then, set the Opacity and Flow of the brush to 50%. Again, feel free to lessen or increase both settings. Sometimes, I leave both at 100%.
Step 11:
So you’ve got your feathered brush selected, now click on the Layer Mask and make sure your Foreground and Background colours are set to Black and White.
How to get perfect skin!
Now brush against the edges of the “face mask” that you’ve created until the edges of the layer look like they fit in to the rest of the face. Pay extra attention on the edges of the eyebrows, hair and such. Once you’re done, lower down the opacity of the layer to about 30%.
How to get perfect skin!
The above is how your final image should look like. I made the opacity of the blurred layer to 30% only because I like to keep the final image as realistic as possible. You can increase the layer opacity to as much as you like if you prefer the “obviously-fake” look (like a certain celebrity-blogger? :P ). Me, I like to fool people to the point of almost disbelief, but with a hint of “Hmmm, maybe it is real!” Heh.
Step 12:
That’s it! That’s all there is to it. Now you can look perfect in your photographs all the time! Hehe. Just be certain to let your readers know that your images are highly Photoshopped and tell them to come here to find out how to do it themselves! We don’t want you getting accused of misrepresentation, now, do we? No, no, we don’t.
The last step can also be used to reduce noise from your images, for example if you’re printing a banner, using photos taken at a high ISO. And the Healing and Cloning tools can also be used to correct any other unwanted marks from your images, like say, dust on a scanned photo.
But editing blemishes away from your photographs is the most fun thing to do, of course. :D If you try this tutorial, show us your before and after pictures, yah? Oh come onnnnn, be a sport! Heh. Here, I’ll start things off with showing my digitally touched up images. :)